Building a Peer to Peer Group Chat using Deno and Webrtc

I'm not a great programmer, I'm just a good programmer with great habits.
, Martin Fowler
3 Oct 2020
Introduction
Messaging and chat applications are common tools that we use daily to communicate with friends or collaborate on work. Automated bot powered by artificial intelligence can also serve as customer service, handling simple queries. Internal bots can be used for application deployment, security monitoring and alert notifications etc... All these innovative services use messaging and chat as the key interface to humans.
This article shows how to build a simple peer to peer group chat application using Deno and webrtc datachannel. It allows communication and collaboration among small groups of people. Of course, a bot can be written and attached to the chat as well, if one so desire.
Rationale for a Group Chat Application
There are many popular chat and messaging applications nowadays like Whatapps, Wechat, Line, Telegram, Discord, Slack etc... So why build our own group chat application ? Actually, there are many reasons. From a tech perspective, coding a group chat is a great way to learn about the underlying technologies and perhaps learning a new programming language.
There are also privacy and security concerns. A small company or organization may want to run its own simple group chat application that is not depedent on external tech companies. By building their own chat applications, they will have better control over the privacy and security of their communication.
Better control of privacy and security are very strong reason for rolling your own chat application. We have seen too many cases of privacy violations and data breaches, even from big tech companies that many of us rely on.
A chat application can also serve as the basis for building more innovative services like automated bots. By having your own application, you can also control what features that it should provide, cutting down on unnecessary functions and complexity. Unnecessary complexity is an enemy of good security.
Design and Approach
Modern web browsers come with webrtc, a technology that allows real time video, voice and data communication. We will build a html 5 group chat application that allows peer to peer messaging through webrtc. For peers to find and connect with each other, a signaling mechanism is required.
A signaling server can be built using Deno. Deno is created by Ryan Dahl, Node JS creator. It is meant to address many of the short comings of NodeJS and has a strong emphasis on security. Deno by default runs in a sandbox. Permissions have to be granted explicitly for network and file access. Deno also has a better dependency system for third party modules. It has a standard library that is reviewed by the Deno core team and which we can use for projects. This gives better assurance that there are no hidden backdoors or malware.
Our signaling server will use websocket. Chat peers will connect to the signaling server using websocket for initial discovery and the exchange of webrtc signaling information.


NAT Traversal and Firewall
Many computers on the internet are behind a network translation device and a firewall. NAT shares a single or a few public internet ip addresses among many internal computers with private ip addresses. A firewall can block and restrict incoming and outgoing network traffic. These can restrict and cause problems for direct peer to peer connections.
For NAT traversal, a STUN server can be specified for webrtc to find the real public ip address of a peer. In our groupchat application, we will use the google public stun server.
It is not guranteed that NAT traversal will be successful. There are NAT types which cannot be traversed. Firewalls can also block and restrict peer to peer connections. In webrtc, a TURN server can be specified as a relay for restrictive networks.
For our simple groupchat application, we will simply fallback to relaying chat messages via the Deno signal server, if peer to peer connection cannot be established. The relaying will use the existing websocket connection between each peer and the signal server.

Security Considerations
Every application has to take security into consideration. Our simple group chat application will implement a login that requires a userid and password. It is served over a TLS/SSL connection. The websocket connections to the deno signal server will be proxied via Nginx with TLS/SSL termination. The peer to peer webrtc datachannels are encrypted by default through the webrtc mandatory encryption, DTLS.
As an additional measure of security, we will use webcrypto to encrypt each chat message using AES 128 bit GCM. Every chat user will generate their own key during the login process. These keys will be distributed to the authorized chat users in the group chat. This also provide a form of perfect forward secrecy, since each login will use a different encryption key.
One may question why have this extra encryption when there is already DTLS. Well, modern PCs, laptops, mobiles and tablets are fast enough that such additional processing won't impose a huge performance impact. No security system is perfect, including the underlying DTLS implementation.
There is a recent post about GnuTLS DTLS vulnerability, Understanding the DTLS all-zero ClientHello.random vulnerability. So it makes sense to have multiple layers of defense, to guard chat messages that are meant to be private.
The signaling server will be built only with the standard library provided by Deno. No third party modules will be used. Simplicity and less dependencies will enhance security.
Back to Basics Approach for the UI
We will take the same basic approach for the user interface of the chat application. It will just be html 5 with a style sheet. The chat application logic will be contained in a single javascript file. No external frameworks like React, Vue etc... will be used.
The user interface will be simple, minimal and functional.
Components of the Group Chat Application
The front end of the group chat application consists of only 3 files.
| Component | Description |
|---|---|
| groupchat.html | The main user interface of the groupchat. |
| style.css | Controls the layout, look and feel of the user interface. |
| groupchat.js | The javascript code and the application logic of the chat application. |
The backend has 2 files. The main typescript deno signaling server using websocket and a utility program for creating chat accounts.
| Component | Description |
|---|---|
| groupchat-server.ts | The signal server using websocket. |
| pass-util.ts | A utility to create chat accounts |
The following shows the overall architecture of the groupchat application. The front end simply uses an nginx webserver to serve the groupchat.html, style.css and groupchat.js to the client browser using https.
The backend uses nginx as a websocket proxy. It directs the websocket connection from the client browser to the deno signaling server. The deno signaling server listens on port 8000 at the localhost. Https (TLS/SSL) is used to proxy the websocket connections.

Private Group feature of Groupchat
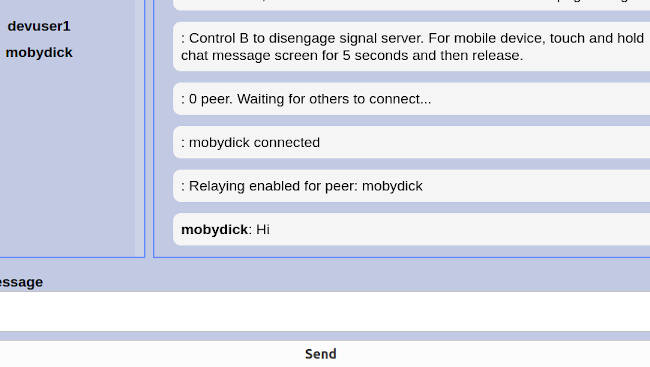
One of the features of the groupchat application is the ability to disengage from the signal server after a peer to peer chat group has been formed. For example, peer A, peer B and peer C are all connected successfully using webrtc in a mesh network. At this point, they can choose to disconnect completely from the deno signal server. All three of them will then be in an isolated peer to peer group where other chat users cannot join.
To disengage from the signal server, the special keys "Ctrl B" can be pressed for desktop browser. On mobile device, touch and hold the chat message screen for 5 seconds and then release. Each of the peer has to activate the disengagement individually.
Note that disengagement from the signal server is meant for peers that have established direct webrtc connection to each other. Peers that are relying on the signal server to relay chat messages will be disconncted if they choose this option.
This private group feature can be quite useful. If 2 persons want to chat only between themselves, this feature enable them to do so in a one to one web chat. It can also be used for a small private group web chat.
Implementation
We will briefly run through some of the source code of the group chat application. The full source is available at the Github link at the end of the article.
Client side code
We will not go through the source for groupchat.html. It contains the html 5 user interface. There are two main components, a login form for logging into the chat application and a chat component. The chat component has two panels at the top, the panel on the left is for displaying a list of chat users who are connected. The panel on the right is for displaying chat messages. There is a form at the bottom for entering and submitting chat messages.
The chat component is initially hidden. It is displayed upon a successful login. You will get to see the user interface at the testing section of this article.
At the top of the groupchat.js file. We define a number of constants. The names of these constants give a hint of what they are for.
1 2 3 4 5 6 7 8 9 10 11 12 13 | const URL = 'wss://nighthour.sg:4430/mygroupchat';
const STUN_SERVER = {'urls': 'stun:stun.l.google.com:19302'};
const PEER_CONNECTION_TIMEOUT = 10000;
const MAX_PEER_RETRIES = 2;
const MAX_PEER_NOACTIVITY_TIME = 60 * 1000;
const MAX_CHAT_HISTORY_SIZE = 250;
const KEEP_ALIVE_INTERVAL = 25 * 1000;
const PEER_KEEP_ALIVE_FAIL_THRESHOLD = 2;
const TOUCH_DISENGAGE_TIME = 5 * 1000;
const ENTROPY_LENGTH = 32;
const AES_KEY_LEN = 128;
const AES_IV_LEN = 12;
const AES_TYPE = "AES-GCM";
|
We define a secure websocket URL (wss://nighthour.sg:4430/mygroupchat) that the group chat application will connect to. The PEER_CONNECTION_TIMEOUT is in milliseconds, if a peer to peer webrtc datachannel is not established by this time, it will be considered a timeout. Take note that the datachannel may still be in the process of being negotiated. The MAX_PEER_RETRIES is not really a reattempt at connection. It is the number of waitings for the connection to be established. A number of 2 here means if the first timeout occured, it will wait for a second time before checking the connection status again.
The reason for doing such a setup with PEER_CONNECTION_TIMEOUT and MAX_PEER_RETRIES is for visual display. We want to show a status message to the chat user if a peer connection has not been established after 10 seconds. By the end of the 2 retries(2 waitings), if a connection is still not established, the application falls back to relaying.
The MAX_PEER_NOACTIVITY_TIME and the PEER_KEEP_ALIVE_FAIL_THRESHOLD are for discovering webrtc peers that are disconnected. When a peer does not have any activity after the MAX_PEER_NOACTIVITY_TIME, the peer will be considered disconnected.
The application sends a keep alive message to each peer every KEEP_ALIVE_INTERVAL (25 seconds) but it does not reply to a keepalive message. If there is an error transmitting the keepalive to a peer, the peer's keepalivefail counter will be incremented.
The MAX_PEER_NOACTIVITY_TIME is 60 seconds. Within this time, two keep alives can be sent. The PEER_KEEP_ALIVE_FAIL_THRESHOLD is set to 2. So if there is error transmitting both keep alive, the peer can be labelled as disconnected, before the MAX_PEER_NOACTIVITY_TIME.
The reason for having MAX_PEER_NOACTIVITY_TIME is that a network disruption may not manifest immediately. A peer may be disconnected due to network problem, computer reboot, power failure etc... But the webrtc datachannel can still accept data including keepalive without throwing up any error. Having a MAX_PEER_NOACTIVITY_TIME will ensure that a disconnected peer can be discovered much more quickly.
The MAX_CHAT_HISTORY_SIZE is the maximum number of messages to show in the chat history. After this limit is hit, for any new message that is displayed, the oldest chat message will be bumped off and removed.
The following shows the definition of an ActiveUser class. This defines the properties of a peer chat user.
1 2 3 4 5 6 7 8 9 10 11 12 13 14 15 16 | /* An active chat user */
class ActiveUser
{
constructor(username, peerconnection, peerkey)
{
this.username = username;
this.peerconnection = peerconnection;
this.datachannel = null;
this.established = false;
this.keepalivefail = 0;
this.lastseen = new Date().getTime();
this.relay = false;
this.secret = peerkey;
}
}
|
Take note of the relay and the established property. The established propery is set to true if a peer to peer webrtc datachannel connection has been successfully established. The relay property is set to true if webrtc connection fails and the peer has to fallback to relaying chat messages via the signal server. These two properties are exclusive, only one of them can be set to true for a single peer.
You can have many peers, some using relaying, some using webrtc datachannels. The chat application allows such a mixture of users. The lastseen property of a peer chat user is updated each time a message from the peer, including keepalive has been received. This can be used to compute how long a peer has been inactive. If a peer is inactive for longer than MAX_PEER_NOACTIVITY_TIME, the peer will be considered disconnected.
The secret property holds the AES encryption key of a peer. This is generated through webcrypto on the browser and sent to the signaling server when a peer logs in. This key will be used to encrypt chat messages sent by the chat user.
The following is the handler for login form submission. It initializes a websocket connection to the signal server by calling initSocket() function. If the websocket is ready, it submits the user credentials, otherwise it submits the credentials after a delay of 1 second. A throttling of 5 seconds is set to prevent excessive submissions. The initSocket() function will set the handler to process any websocket messages.
1 2 3 4 5 6 7 8 9 10 11 12 13 14 15 16 17 18 19 20 21 22 23 24 25 26 27 28 29 30 31 32 33 34 35 36 37 38 39 40 41 42 43 44 45 46 47 48 49 50 51 52 53 54 55 56 57 58 59 60 61 62 63 64 65 | /* Web form handles the user login */
function login()
{
if(login_throttle) return;
const form_login = document.getElementById("login_form");
let form_username = form_login.username.value;
let password = form_login.password.value;
if (form_username === "" || password === "")
{
alert("Username and password cannot be empty!");
return;
}
initSocket();
let msg_comp = document.getElementById('login_msg');
msg_comp.innerHTML = "Logging in please wait....";
/* websocket not connected yet */
if(socket.readyState !== 1)
{
setTimeout(
()=>{
submitLogin(form_username, password);
form_username = password = "";
},
1000
);
}
else
{
submitLogin(form_username, password);
form_username = password = "";
}
/* throttle the login rate to once per 5 second */
const btn_login = document.getElementById("login_btn");
btn_login.diabled = true;
login_throttle = true;
setTimeout(
function() {
btn_login.diabled = false;
login_throttle = false;
msg_comp.innerText = "";
if(!login_success)
{
try
{
socket.close();
}
catch(err)
{
debug_log("Error closing websocket " + err);
}
}
},
5000
);
}
|
The following shows the processMsg() function. This is the handler for messages that arrive from the websocket. The messages are all formatted as JSON.
Upon receiving the "LoginSuccess" message, the loginSuccess() function is called. The chat component is displayed. A unique session id is also set for the current chat user. This id is required when communicating with the signal server. A function to send keep alives for the websocket connection is also started.
When a chat user authenticates successfully, the server will also send a "RelayOpt" message to indicate whether it supports relaying of chat messages. By default, relaying is supported. A "UserList" message will follow, containing an array of peers who have already logged in.
The chat client will invoke the initialize_peers() function and starts connecting to this list of peers.
1 2 3 4 5 6 7 8 9 10 11 12 13 14 15 16 17 18 19 20 21 22 23 24 25 26 27 28 29 30 31 32 33 34 35 36 37 38 39 40 41 42 43 44 45 46 47 48 49 50 51 52 53 54 55 56 57 58 59 | /* Process the websocket messages */
function processMsg(event)
{
let obj;
try
{
obj = JSON.parse(event.data);
}
catch(err)
{
debug_log("Json parsing error " + err);
return;
}
switch(obj.command)
{
case "LoginSuccess":
loginSuccess(obj);
break;
case "UserList":
initialize_peers(obj.userlist);
break;
case "Offer":
acceptPeerOffer(obj);
break;
case "Answer":
acceptPeerAnswer(obj);
break;
case "Icecandidate":
acceptPeerIce(obj);
break;
case "RelayOpt":
setRelayOption(obj);
break;
case "ChatMsg":
handleRelayChatMessage(obj);
break;
case "RelayFail":
handleRelayFail(obj);
break;
case "Disconnect":
handleDisconnectNotice(obj);
break;
case "Pong":
debug_log("keepalive reply from signal server");
break;
default:
debug_log("Unknown websocket command");
break;
}
}
|
The following code snippet shows the initialize_peers() function. For each peer, connectToPeer() function is invoked to start the webrtc connection request. Webrtc follows a certain sequence to establish a peer to peer connection.
Briefly, the initiator sends a connection offer to a peer through a signaling mechanism. The peer accepts the offer and sends back an answer. The initiator accepts the answer. ICE candidates are also exchanged between the 2 through the signaling mechanism. ICE candidates contain connectivity information, like the real ip addresses of the peers. Refer to the Mozilla WebRTC Guide for a more detailed description of webrtc.
The checkPeerConnectionStatus() function is called after a period of time (PEER_CONNECTION_TIMEOUT) to check if the webrtc datachannel has been opened successfully. If the webrtc connection fails, relaying through the signal server will be the fallback option. Take note that there is an option that the signal server can set to disable relaying of chat messages.
1 2 3 4 5 6 7 8 9 10 11 12 13 14 15 16 17 18 19 20 21 22 23 24 25 26 27 28 29 30 31 32 33 34 35 36 37 38 39 40 41 42 43 44 | /* Initialize connections to peers from userlist */
async function initialize_peers(userlist)
{
let arr = userlist;
let num_peer = arr.length - 1;
let message = "";
if (num_peer === 0)
{
message = "0 peer. Waiting for others to connect...";
}
else
{
message = "Connecting to " + num_peer + (num_peer > 1 ? " peers" : " peer");
}
displayChatMessage("", message);
for(let i=0; i < arr.length; i++)
{
let obj = arr[i];
let peername = obj.user;
let secret_arr = obj.secret;
if(peername === undefined || secret_arr === undefined || peername === username) continue;
let peerkey = await getSecretKey(secret_arr);
if(peerkey === null)
{
debug_log("Invalid key from peer " + peername + " skipping");
continue;
}
connectToPeer(peername, peerkey);
/* Fall back to relaying if webrtc fails */
setTimeout(
()=>{
checkPeerConnectionStatus(peername, MAX_PEER_RETRIES, true);
},
PEER_CONNECTION_TIMEOUT
);
}
}
|
The following shows the source code for checkPeerConnectionStatus() function. It checks whether the webrtc datachannel is established successfully. If the webrtc connection fails, relaying through the signal server is enabled.
1 2 3 4 5 6 7 8 9 10 11 12 13 14 15 16 17 18 19 20 21 22 23 24 25 26 27 28 29 30 31 32 33 34 35 36 37 38 39 40 41 42 43 44 45 46 47 48 49 50 51 52 53 54 55 56 57 58 59 60 61 62 63 64 65 66 67 68 69 70 71 72 73 74 75 76 77 78 79 80 81 82 83 84 85 86 87 88 89 90 91 92 93 94 | /*
Check peer connection status.
If relaying is enabled on the server, a peer can fallback to relaying if webrtc fails.
The display_retry_flag should be set to true for the peer starting the connection to other peers
For peers receving connections, the display_retry_flag should be set to false to avoid unnecessary
status messages.
*/
function checkPeerConnectionStatus(peername, retries, display_retry_flag)
{
peer = activeusers.get(peername);
if(peer === undefined)
{
if(display_retry_flag)
{
displayChatMessage("", "WebRtc connection failed for peer: " + peername);
}
return;
}
if(retries === 0)
{
if(allow_relay)
{/* relaying is allowed by server */
peerConnectionSuccess(peer, false, true);
}
else
{
displayChatMessage("", "WebRtc connection failed for peer: " + peername);
activeusers.delete(peername);
}
return;
}
/*
RTCDataChannel.readyState
open
connecting
closed
closing
*/
if(peer.datachannel !== null)
{
switch(peer.datachannel.readyState)
{
case "connecting":
if(display_retry_flag)
{
displayChatMessage("", "Trying to connect to peer: " + peername);
}
setTimeout(
()=>{
checkPeerConnectionStatus(peername, retries -1,display_retry_flag);
},
PEER_CONNECTION_TIMEOUT
);
break;
case "closed":
case "closing":
if(allow_relay === true)
{
peerConnectionSuccess(peer, false, true);
}
else
{
if(display_retry_flag)
{
displayChatMessage("", "WebRtc connection failed for peer: " + peername);
}
activeusers.delete(peername);
}
break;
default:
break;
}
}
else
{
setTimeout(
()=>{
checkPeerConnectionStatus(peername, retries -1,display_retry_flag);
},
PEER_CONNECTION_TIMEOUT
);
}
}
|
The following shows the code snippet for setDataChannelEventHandler() function. This function is called when setting up the webrtc connection. For the initiator, it is called when connecting to peers. For the other peers receving an incoming webrtc connection offer, this function is invoked in the ondatachannel event.
setDataChannelEventHandler() configures the handlers to be called when events occurred in the webrtc datachannel, such as a message arriving, or the datachannel being closed etc... The receiveChatMessage() function is called when messages arrive from the webrtc datachannel connection.
1 2 3 4 5 6 7 8 9 10 11 12 13 14 15 16 17 18 19 20 21 22 23 24 25 26 27 28 29 30 31 32 33 34 35 36 37 38 39 40 41 42 43 | /* Set the webrtc datachannel event handler */
function setDataChannelEventHandler(datachannel, peername)
{
datachannel.onopen = (event) =>
{
debug_log("Data channel opened to peer " + peername);
let peer = activeusers.get(peername);
if(peer === "undefined")
{
displayChatMessage("", "Serious error for peer: " + peername);
debug_log("Cannot get peer from activeusers for datachannel onopen " + peername);
return;
}
peerConnectionSuccess(peer, true, false);
}
datachannel.onmessage = (event) =>
{
debug_log("Data channel received message " + event.data);
receiveChatMessage(event.data);
}
datachannel.onclose = (event) =>
{
let peer = activeusers.get(peername);
if(peer === "undefined" || !peer.established) return;
peerDisconnected(peer.username);
}
datachannel.onerror = (event) =>
{
let peer = activeusers.get(peername);
if(peer === "undefined" || !peer.established) return;
debug_log("Network error " + peername);
datachannel.close();
}
}
|
We will go through one more function on the client side. For the full source code, refer to the Github link at the end of the article. Our chat application needs to display connected users as well as chat messages. These are appended to the html DOM programmatically. It is important that we sanitize these messages and user names to prevent Cross side scripting (XSS) attacks.
The following shows the code snippet for the sanitize() function. Since we are inserting messages and usernames into HTML content, we follow rule 1 of the Owasp cross side scripting prevention cheatsheet and sanitize the appropriate characters.
1 2 3 4 5 6 7 8 9 10 11 12 13 | /* Sanitize Msg for inclusion into HTML element Owasp xss prevention cheatsheet rule 1 */
function sanitize(untrusted)
{
let sanitized = ""
sanitized = untrusted.replace(/&/g, "&");
sanitized = sanitized.replace(/</g, "<");
sanitized = sanitized.replace(/>/g, ">");
sanitized = sanitized.replace(/"/g, """);
sanitized = sanitized.replace(/'/g, "'");
sanitized = sanitized.replace(/\//g, "/");
return sanitized;
}
|
Server Side Code
On the server side, we use Deno and the standard library that is part of Deno. No other third party modules are used.
The following shows the source of the utility, pass-util.ts, that we use to create chat accounts. The accounts are stored in a text based password file. The password of each account is concantenated with a 14 character random salt and hashed with sha256.
Note this is a weak form of password hashing for storage. But it is quick and sufficient for our needs here. To mitigate against any potential vulnerabilities, the chat users are reminded not to reuse their chat account passwords. Each account password is allocated by the administrator and is sufficiently long and complex. For more secure password hashing, bcrypt, scrypt or some other modern hashing techniques should be used.
1 2 3 4 5 6 7 8 9 10 11 12 13 14 15 16 17 18 19 20 21 22 23 24 25 26 27 28 29 30 31 32 33 34 35 36 37 38 39 40 41 42 43 44 45 46 47 48 49 50 51 52 53 54 55 56 57 58 59 60 61 62 63 64 65 66 67 68 69 70 71 72 73 74 75 76 77 78 79 80 81 82 83 84 85 86 87 88 89 90 91 92 93 94 95 96 97 98 99 100 101 102 103 104 105 106 107 108 109 110 111 112 113 114 115 116 117 118 119 120 121 122 123 124 125 126 127 | /*
Simple deno app to add a user into a password file for groupchat application.
The password file is located at pass/passwd
The directory pass must be present. Create it if necessary.
The app uses a 14 digit random salt plus sha256 hashing from deno standard library.
This is for simplicity. For stronger security, bcrypt or scrypt or some other
modern password derivation algorithm should be used instead.
deno run --allow-write=./ --allow-read=./ pass-util.ts [username]
Note that dupliate userid will not be checked.
Ng Chiang Lin
Sep 2020
*/
import { readLines } from "https://deno.land/std@0.71.0/io/mod.ts";
import { createHash } from "https://deno.land/std@0.71.0/hash/mod.ts";
let passdir = 'pass';
let password_file_tmp = passdir + "/passwd.tmp";
let password_file = passdir + "/passwd";
let random_char_set = "ABCDEFGHIJKLMNOPQRSTUVWXYZ()&[]abcdefghijklmnopqrstuvwxyz0123456789-!@#$%^";
let random_length = 14;
let password_min_length = 16;
let args = Deno.args;
if (args.length != 1)
{
console.log("Adds a user to the groupchat password file");
console.log("Usage: deno --allow-write=./ pass-util.ts [username]");
Deno.exit(1);
}
let username = args[0];
if(username.length < 3 || username.includes(":"))
{
console.log("username must be minimum 3 characters and cannot contain \":\"");
Deno.exit(1);
}
const encoder = new TextEncoder();
let done = false;
let pass = '';
while (!done)
{
Deno.stdout.write(encoder.encode("Enter password: "));
pass = '';
for await (pass of readLines(Deno.stdin))
{
break;
}
if(pass.length < password_min_length)
{
console.log("Password must be at least ", password_min_length);
}
else
{
done = true;
}
}
let i:number;
let random_string = "";
for (i = 0 ; i < random_length; i++)
{
let len = random_char_set.length;
let ran = Math.floor((Math.random() * len) + 1);
random_string = random_char_set.charAt(ran) + random_string;
}
pass = pass + random_string;
const hash = createHash("sha256");
hash.update(pass);
const hexstring = hash.toString();
let line = username + ":" + random_string + ":" + hexstring + "\n";
try
{
Deno.openSync(password_file,{read:true});
}
catch(err)
{
/* passwd file not found */
await Deno.writeTextFile(password_file, line, {append: true});
Deno.exit(0);
}
Deno.copyFile(password_file, password_file_tmp).then
(
() => {
Deno.writeTextFile(password_file_tmp, line, {append: true});
}
)
.then
(
() => {
Deno.rename(password_file_tmp, password_file);
}
)
.catch(
(err) => {
console.log("An error occurred " + err);
Deno.exit(1);
}
);
|
The following shows some of the classes, the constants defined that are used by the signaling server application.
1 2 3 4 5 6 7 8 9 10 11 12 13 14 15 16 17 18 19 20 21 22 23 24 25 26 27 28 29 30 31 32 33 34 35 36 37 38 39 40 41 42 43 44 45 46 47 48 49 50 51 52 53 54 55 56 57 | class ValidUser
{
username: string;
random: string;
hash: string;
failed: number;
locked: boolean;
constructor(username:string, random:string, hash:string)
{
this.username = username;
this.failed = 0;
this.locked = false;
this.random = random;
this.hash = hash;
}
}
class ChatUser
{
username : string;
uuid: string;
sock: WebSocket;
lastseen: number;
secret: number[];
constructor(username:string, sock:WebSocket, secret:number[])
{
this.username = username;
this.sock = sock;
this.uuid = v4.generate();
this.lastseen = Date.now();
this.secret = secret;
}
}
let users = new Map<string, ChatUser>();
let passwd_users_list:Array<ValidUser> = [];
let socket_list:WebSocket[] = [];
let num_sockets = 0;
let server_start_time = 0;
let allow_relay = true;
const PASSWD_FILE = "pass/passwd";
const MAX_FAILED_LOGIN = 5;
const MAX_SOCKETS = 30;
const HOUSE_KEEP_INTERVAL = 15 * 60 * 1000;
const KEEP_ALIVE_INTERVAL = 25 * 1000;
const SESSION_INTERVAL = 75 * 1000;
const USER_ENTROPY_LENGTH = 64;
const http_options = {hostname:"127.0.0.1",port:8000};
|
ValidUser class defines the authorized users for our chat application. When the signaling server starts up, it will read in the password file containing all the authorized users. Each user entry is saved as a ValidUser in the passwd_users_list array. The application will use this array of authorized users for authenticating log in.
ChatUser class defines a chat user who has logged in successfully. All the chat users are stored in a javascript Map, users. Each authenticated chat user is assigned a unique id, uuid. Think of this like a session identifier. Each time, a chat user wants to communicate with the signal server, it needs to present this session identifier.
The MAX_SOCKETS defines the maximum number of websocket connections that the signal server will accept. In this case, we are restricting to 30. This means that at most 30 chat users can be actively connected to the signal server. Remember the private group feature of the group chat application discussed earlier ? The private group feature allows the group chat application to support isolated, indepedent peer to peer groups that doesn't have to be connected persistently to the signal server.
To accomodate more chat users, the MAX_SOCKETS can be increased. For a small groupchat application, meant to allow collaboration between a small to medium team, 30 is a reasonable figure.
The SESSION_INTERVAL needs a bit of explaining. This is equivalent to the MAX_PEER_NOACTIVITY_TIME in the front end chat client application. On the server side, if a authenticated chat user doesn't have any activity within this SESSION_INTERVAL, the chat user will be deemed to have been disconnected.
The front end chat client application will send a websocket keepalive to the server every 25 seconds. The signal server will respond to this with a reply of its own. The lastseen time of each chat user will be updated when the server receives a keep alive from that user.
The signal server itself will run a "alive" check for all the connected chat users every KEEP_ALIVE_INTERVAL (25 seconds). This check doesn't send any network traffic, it simply run through the list of users and disconnect those who doesn't have any activity for more than SESSION_INTERVAL.
The following shows the processMsg() handler for the websocket messages at the signal server.
1 2 3 4 5 6 7 8 9 10 11 12 13 14 15 16 17 18 19 20 21 22 23 24 25 26 27 28 29 30 31 32 33 34 35 36 37 38 39 40 41 42 43 44 45 46 47 | /* Process the types of message */
async function processMsg(sock: WebSocket, clientstring:any, msg:string)
{
let obj;
try
{
obj = JSON.parse(msg);
}
catch(err)
{
log.error({message: "invalid json : " + clientstring + " : " + new Date(), Error: err});
await cleanUpSocket(sock,null);
return;
}
if(obj.command === undefined)
{
log.error("command not present : " + clientstring + " : " + new Date());
await cleanUpSocket(sock,null);
return;
}
switch(obj.command)
{
case "Login":
handleUserLogin(clientstring, obj, sock);
break;
case "Offer":
case "Answer":
case "Icecandidate":
relayToPeer(obj);
break;
case "Ping":
handlePing(obj);
break;
case "RelayChatMsg":
handleRelayChatMessage(obj);
break;
default:
log.warning("invalid command from : " + clientstring + " : " + new Date());
await cleanUpSocket(sock,null);
break;
}
}
|
The handleUserLogin() function is called when a login request is received. Any failed login will be noted. If a user account has more than 5 failed login attempts, it will be locked. This is to prevent brute forcing attempts. The lock isn't permanently and will be reset when the signal server is restarted.
The relayToPeer() function handles all the webrtc signaling messages between the chat peers. For chat users who cannot established direct peer to peer webrtc connection, the handleRelayChatMessage() is used to handle relaying of chat messages through the signal server.
The ideal situation is not to have relaying at all, but have all the peers connected through a direct mesh based peer to peer network. This will significantly cut down on load and bandwidth consumption for the signal server. It will also ensure greater privacy and security; since all the chat messages are direct and don't have to be relayed by the signal server.
We will run through one more function on the signal server. Refer to the Github link at the end of the article for the full source code.
The signal server implements a houseKeep() function that runs periodically. It checks and removes stale socket connections and also prints out important statistics such as the number of failed logins and locked accounts. This provides alerts to administrators on whether there are any malicious attacks going on.
1 2 3 4 5 6 7 8 9 10 11 12 13 14 15 16 17 18 19 20 21 22 23 24 25 26 27 28 29 30 31 32 33 34 35 36 37 38 39 40 41 42 43 44 45 46 47 48 49 50 51 52 53 54 55 56 57 58 59 60 61 62 63 64 65 66 67 68 69 70 71 | /* House keeping to check stale sockets and print statistics */
async function houseKeep()
{
let num_stale_sock = 0;
let socket_list_length = socket_list.length;
let to_close_socket: WebSocket[] = [];
/* Clear sockets that don't belong to chat users */
for (let i = 0; i < socket_list_length ; i++)
{
let sock = socket_list[i];
let user = findUserFromSocket(sock);
if(user=== null)
{ /* Socket doesn't belong to chat users */
num_stale_sock++;
to_close_socket.push(sock);
}
}
/* clear socket list */
socket_list = [];
for(let i = 0 ; i < to_close_socket.length ; i++)
{
let sock = to_close_socket[i];
if(!sock.isClosed)
{
num_sockets--;
await sock.close(1000).catch(log.error);
}
}
/*
check for failed logins and locked accounts
*/
let user_failed_login = 0;
let user_locked = 0;
for(let i = 0; i < passwd_users_list.length; i++)
{
let valid_user = passwd_users_list[i];
if(valid_user.failed > 0) { user_failed_login++; }
if(valid_user.locked) { user_locked++; }
}
let server_uptime = Date.now() - server_start_time;
let currentdate = new Date();
log.info(" ");
log.info("-------------------------Statistics------------------------");
log.info(currentdate);
log.info("Server uptime: " + server_uptime);
log.info("Number of sockets (num_sockets): " + num_sockets);
log.info("Number of sockets before cleanup (socket_list): " + socket_list_length);
log.info("Number of stale sockets before cleanup (socket_list): " + num_stale_sock);
log.info("Number of chat users: " + users.size);
log.info("Number of accounts with failed login: " + user_failed_login);
log.info("Number of accounts locked: " + user_locked);
log.info("------------------------------------------------------------");
log.info(" ");
setTimeout(
houseKeep,
HOUSE_KEEP_INTERVAL
);
}
|
Deploying the group chat application
We will deploy the chat application on a Debian 10 (buster) system running nginx. Nginx will be the webserver serving out the client chat application. It will also proxy the websocket connections to our deno signaling server.
On the Debian 10 system, let's create a non privilege user called deno. We will run the signaling server under this account. Run the following command and fill in the information for the deno user when prompted.
Do some minimal hardening for the deno account.
sudo echo "umask 077" >> /home/deno/.bashrc
Switch to the newly created user.
Download the latest deno binary from https://github.com/denoland/deno/releases
Unzip the deno binary.
Deno ships as a single binary and we now have a deno runtime that we can use. Copy the groupchat-server.ts and pass-util.ts file to the Debian 10 system. We will store these 2 files in the home directory of the deno account.
Create the pass directory that will hold our password file containing the list of chat users.
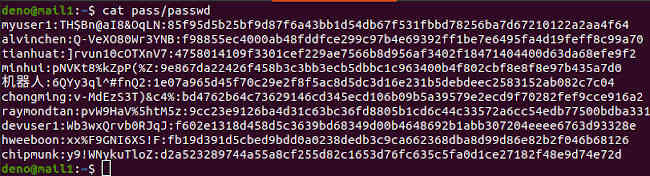
Let's create our chat users using the pass-util.ts. Run the following command and enter a long complex password when prompted.
This will create a chat user account called "myuser1". Notice that we need to explicitly pass read and write permissions to the deno runtime. By default deno runs in a sandbox, permissions are required for it to access the filesystem. The first time that the pass-util.ts program is run, deno will download the necessary standard libraries that pass-util.ts depends on. We only use the deno standard library that is vetted by the core deno team.
Continue to create the other chat users. You should get a password file like the following.
Make sure to secure the pass directory and passwd file with proper ownership and permissions. Run the following commands to set a restrictive permission on the file and directory.
chmod 600 pass/passwd
Once the chat accounts are created, we can start up the signal server with the following command.
Exit from the deno user account and switch back to your regular debian account with sudo rights.
Copy the groupchat.html, style.css and groupchat.js files into the web document root of the nginx server. Make sure that these files are set with the right ownership and secure permissions (chmod 644).
For simplicity we create a new server block listening on port 4430. The following shows the configuration.
map $http_upgrade $connection_upgrade {
        default upgrade;
        '' close;
}

upstream websocket {
        server 127.0.0.1:8000;
}


server{

     listen       139.59.249.168:4430 ssl http2;
        server_name  www.nighthour.sg nighthour.sg;
        root   /var/nginx/www;
        charset utf-8;

        ssl_certificate      /etc/letsencrypt/live/nighthour.sg/fullchain.pem;
        ssl_certificate_key  /etc/letsencrypt/live/nighthour.sg/privkey.pem;

        ssl_session_timeout 15m;
        ssl_session_cache shared:SSL:50m;
        ssl_session_tickets off;

        ssl_protocols TLSv1.2 TLSv1.3;
        ssl_ciphers 'ECDHE-ECDSA-CHACHA20-POLY1305:ECDHE-RSA-CHACHA20-POLY1305:ECDHE-ECDSA-AES128-GCM-SHA256:ECDHE-RSA-AES128-GCM-SHA256:ECDHE-ECDSA-AES128-SHA256:ECDHE-RSA-AES128-SHA256';
        ssl_prefer_server_ciphers  on;

        ssl_stapling on;
        ssl_stapling_verify on;
        ssl_trusted_certificate /etc/letsencrypt/live/nighthour.sg/fullchain.pem;
        resolver 8.8.8.8 8.8.4.4 valid=300s;
        resolver_timeout 5s;

        access_log  /var/log/nginx/ssl_chat_access.log  main;

            add_header X-Content-Type-Options "nosniff";
            add_header X-Frame-Options "DENY";
            add_header X-XSS-Protection "1; mode=block";
            add_header Strict-Transport-Security "max-age=31536000;includeSubDomains";
            add_header Cache-Control $cachemap;
            add_header Referrer-Policy "same-origin";

        location /{

            index  index.html index.htm;
            root /var/www/ramdisk/html/chat;

        }

         location /mygroupchat {
            proxy_pass http://websocket;
            proxy_http_version 1.1;
            proxy_set_header Upgrade $http_upgrade;
            proxy_set_header Connection $connection_upgrade;
            proxy_set_header Host $host;
            proxy_read_timeout 120s;

        }


        # redirect server error pages to the static page /50x.html
        error_page   500 502 503 504  /50x.html;
        location = /50x.html {
            root   html;
        }


}
The reason for creating a new server block is due to content security policy (CSP). My main site has CSP enabled which is good for security. This cause an issue with the group chat application though. The group chat violates connect-src directive when it is making the webrtc connection. We can of course modify the CSP directive to allow connect-src to our own nighthour.sg.
But the browser also requires the CORS (cross origin request), Accept Origin header, to be set at the destination server. Again this is no problem with my own domain nighthour.sg. However, the chat application also uses the public google stun server, which is outside of our control.
The right way to solve this, is to run our own stun server at stun.nighthour.sg and we will have no problem configuring whatever CORS headers that are required. The short cut method is to disable CSP for the chat application.
Our groupchat application has properly sanitized all the untrusted output and I am confident enough that it does not have any XSS vulnerability. So we shall use the short cut method. By setting up a new nginx server block, my main site can continue to have its CSP policy, while the chat app can proceed without CSP.
The location setting for "/" defines a root directive. This is the document root where the 3 chat application files should be placed. For my site, I am actually serving it out of a ramdisk.
location /{

    index  index.html index.htm;
    root /var/www/ramdisk/html/chat;

}
The location setting for "/mygroupchat" is where the groupchat.js will make a websocket connection to. In groupchat.js, we define the websocket URL as "wss://nighthour.sg:4430/mygroupchat". Nginx will proxy the websocket to our backend deno signal server listening on localhost (127.0.0.1) port 8000.
location /mygroupchat {
    proxy_pass http://websocket;
    proxy_http_version 1.1;
    proxy_set_header Upgrade $http_upgrade;
    proxy_set_header Connection $connection_upgrade;
    proxy_set_header Host $host;
    proxy_read_timeout 120s;

}
Restart nginx with the new configuration. The group chat application is now ready to be tested.
Testing the Group Chat Application
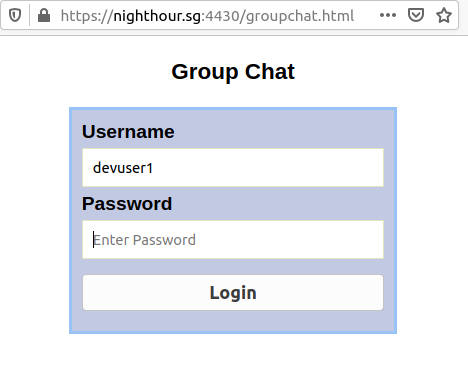
We can launch our browser at https://nighthour.sg:4430/groupchat.html to log into the chat application.
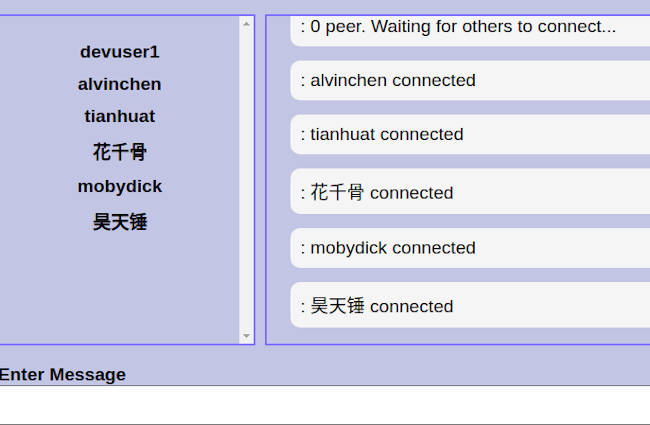
After logging in, you should see a welcome message. If there are no other chat users who have logged in, you will see the message "waiting for others to connect". Some instructions on how to use the chat application will be displayed too. To exit, just close the browser window or tab. To log out, just reload or refresh the page.

When other users have logged in, you should see them appearing in the users listing on the left panel. A notification message that a user has connected will also be shown.
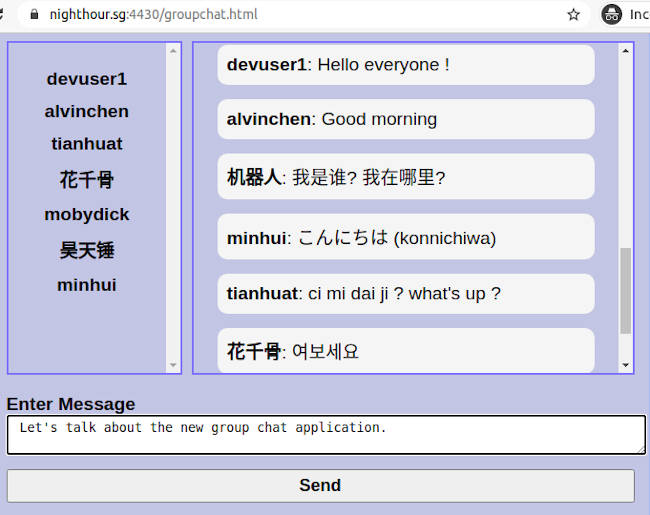
You can just start chatting by typing in your message and then click on send.
When chat users disconnect or exit. You will get a notification message and the users will be removed from the users listing panel.
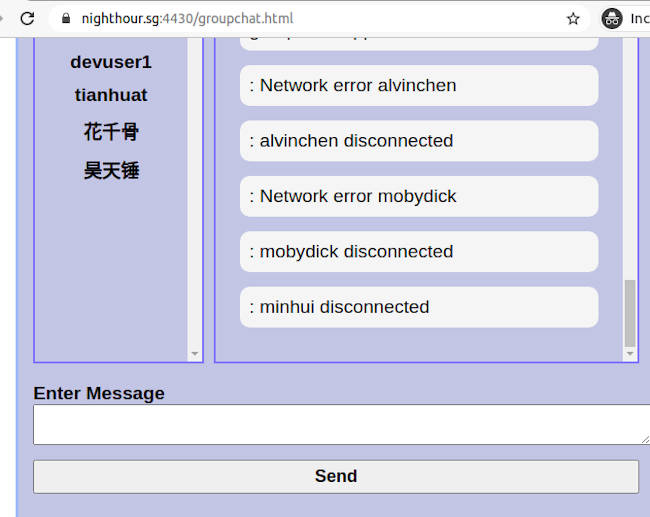
If a chat user can't connect peer to peer using webrtc, the chat application will fall back to relaying. A notification message will indicate that relaying is enabled for a user. Take note that this message doesn't mean that the particular user system is blocking peer to peer connection. It could well be your own system that is preventing peer to peer, hence falling back to relaying. Get your tech guy to help troubleshoot and see if peer to peer can be enabled.
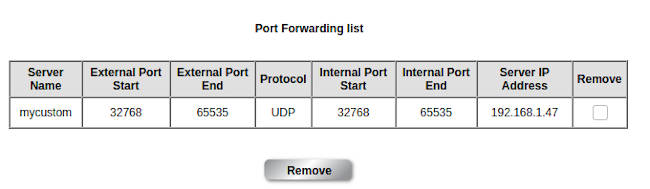
On my home fibre broadband connection, I need to enable port forwarding on my residential gateway device in order for peers that are on the internet to connect directly via webrtc. I forwarded the range of ephemeral ports 32768 to 65535 for UDP to my computer on the internal network. Take note that port forwarding can have security implications. For my case, my computer is running Linux, it is the same sort of systems that I will put up on the open internet, like my website: nighthour.sg. I am more than confident that there won't be any security issues for my computer even if I forwarded the UDP ports.
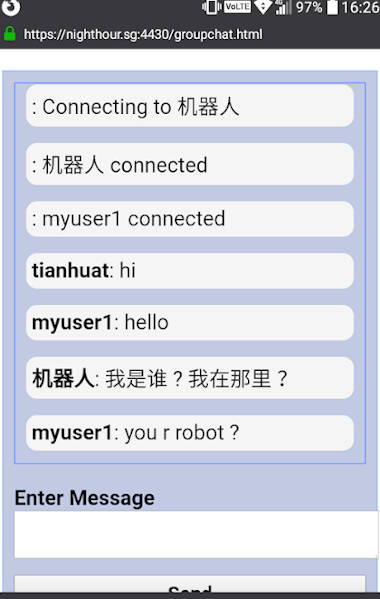
The group chat application will look slightly different on a mobile screen. On a mobile device, the user listing will not be shown. This is due to the limited screen space on mobile device.
I will not go through the signal server disengagement feature. On a desktop, control B can be pressed to activate this. On a mobile, touch and hold the chat screen for 5 seconds or more and then release. This will disconnect from the signal server, allowing private peer to peer chat groups to be formed. Play around with the chat application on your own.
Conclusion and Afterthought
Chat and messaging are important communication tools in our modern world. These tools can often be extended with automated bots that can carry out many services. By building a simple chat application ourselves, we can learn some of the basics of this communication interface.
Security and privacy concerns are strong reasons for rolling out your own simple group chat application. It reduces dependence on big external tech companies and enable better control of user data and privacy. A group chat application is not difficult to build. When done right, it can help a small company or organization to have better security and privacy.
What is behind a chat user, an automated AI powered bot ? An interface to an application deployment system ? An interface to a monitoring system, or even an interface to a real physical machine ? Perhaps like a "disoriented" robot that keeps asking "who am i, where am i..." The basics of chat and messaging is just a start, there are many more innovative uses that are yet to be explored.
In Singapore push to go digital, automated messaging and chat bots can have a role too. For example, we can have a hokkien speaking chat bot that can engage with older folks, easing them into the unfamiliar world of digital technology.
This article shows the basics of a peer to peer group chat application using webrtc datachannel and a deno signaling server. It allows for small groups of people to communicate and collaborate. From such basics, it is possible to explore, and imagine other more innovative uses for chat and messaging.
Useful References
- Deno, A secure runtime for javascript and typescript.
- Mozilla WebRTC API, Mozilla developer network guide to the webrtc api.
- webrtc.org, A getting started guide about webrtc technology.
- Getting Started with WebRTC, A good article introducing webrtc.
- Video tutorials on Deno and Websockets chatroom, A useful tutorial on Deno and websockets chatroom.
- Owasp XSS Prevention Cheatsheet, A useful resource on preventing cross site scripting attacks.
- Understanding the DTLS all-zero ClientHello.random vulnerability, A blog post about the DTLS vulnerability in GnuTLS.
The full source code for the scripts are available at the following Github link.
https://github.com/ngchianglin/DenoWebRTCGroupChat
If you have any feedback, comments, corrections or suggestions to improve this article. You can reach me via the contact/feedback link at the bottom of the page.